-
Shop
- Advanced Technologies
- AI Career Advantage Collection
- Apple Accessories
- Bathroom
- Best Sellers
- Black Friday Sale
- Car Accessories
- Digital Products
- Digital Resources
- Fashion
- Furniture
- Gadgets
- Gift Ideas
- Health & Beauty
- Home
- Home & Garden
- Home Decor
- Home Electronics
- Home Supplies
- Independence Day
- Kitchen
- Lighting
- Mother’s Day
- Patio, Lawn & Garden
- Pet Supplies
- Pets
- Samsung Accessories
- Special Deals
- Sport & Outdoors
- Super Deals
- Travel & Outdoors
- Watches
- New arrivals
- Featured
Milk Frothing Pitcher with Scale: Consistent Microfoam
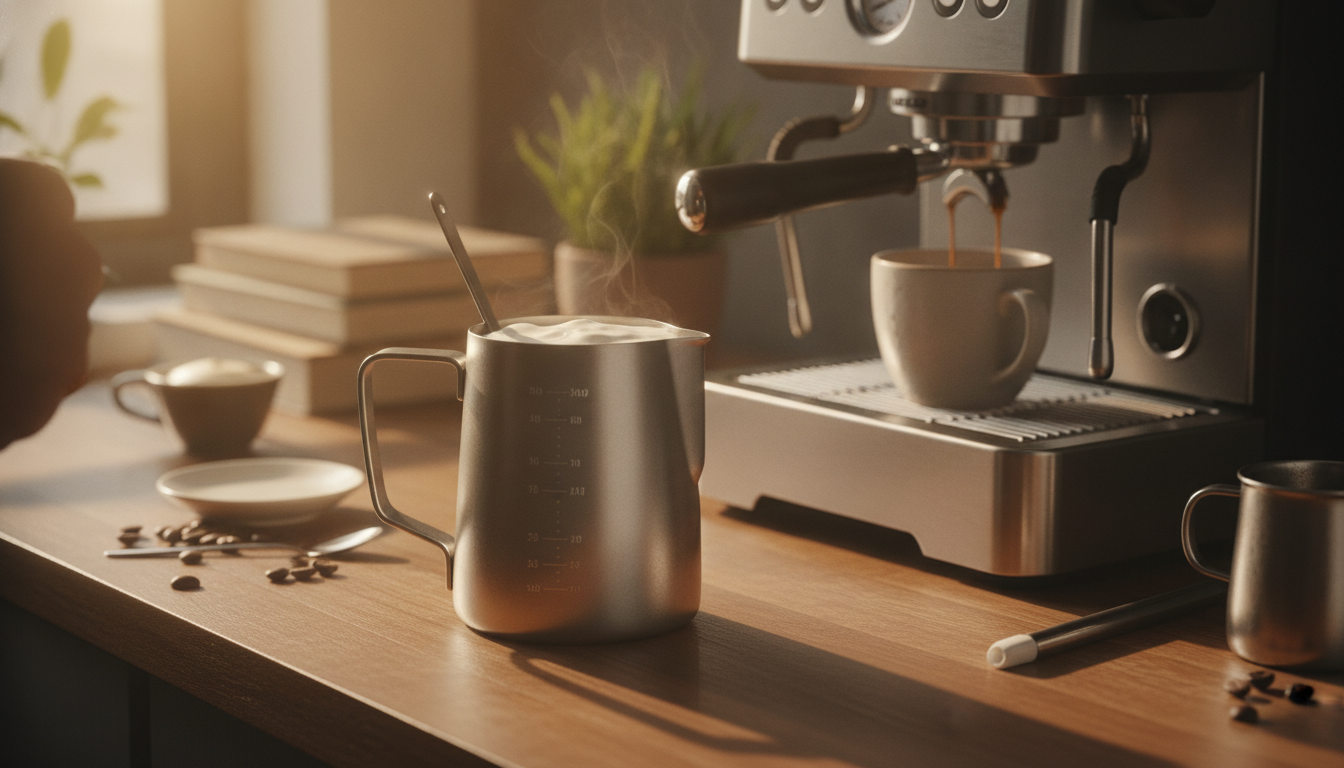
Stainless Steel Milk Frothing Pitcher with Scale
A milk pitcher with an integrated scale takes the guesswork out of steaming and pouring, making it easier to repeat the same texture and volume for cappuccinos, lattes, and flat whites. Stainless steel construction helps with fast heat transfer, so temperature changes are easy to feel in your hand while steaming. Clear measurement markings also simplify dosing, reduce leftover steamed milk, and keep the workflow cleaner from the first pour to the last. For more guidance, see Development Document for Effluent Limitations Guidelines ….
What a pitcher with a built-in scale changes in daily coffee making
When milk is measured before steaming, every drink starts with a consistent input. That small change affects flavor balance, foam quality, and even cleanup. For further reading, see Steaming Milk Want That Perfect Latte Or Cappucci.
- Improves consistency: measuring milk before steaming replaces “eyeballing” with a repeatable target.
- Helps reduce waste: dosing closer to what each cup needs means less milk left in the pitcher after pouring.
- Supports repeatable results: pairing a set milk amount with the same cup size, espresso yield, and steaming routine makes results more predictable.
- Useful for learning: beginners can track what amounts create the best microfoam for their cups and latte art patterns.
For anyone dialing in milk drinks, this approach lines up with how many cafés standardize beverage builds: control inputs first, then refine technique. For broader coffee education and standards, the Specialty Coffee Association (SCA) is a widely recognized reference point.
Key design details to look for
Not all pitchers behave the same at the steam wand. A few design choices strongly influence how easily milk integrates into glossy microfoam.
- Stainless steel body: durable, resistant to corrosion when cleaned properly, and responsive to temperature changes during steaming.
- Comfortable handle: should feel stable when swirling and tapping to polish foam.
- Pour spout control: supports a narrow, steady stream for latte art lines and cleaner layered pours.
- Clear internal scale markings: lets you verify dosing quickly during prep or when making multiple drinks.
- Whirlpool-friendly shape: encourages a strong rolling motion to fully integrate foam and milk.
Stainless steel is also commonly used for food contact applications; for general guidance on food-contact considerations, the U.S. FDA’s Food Contact Substances page is a helpful reference.
Steaming and frothing workflow (repeatable routine)
A consistent routine is what turns good gear into reliable drinks. Use the same steps every time, then make small adjustments based on what you see in the milk and how it pours.
- Dose by weight/mark: add milk to the same target amount for the cup size you’re making.
- Purge briefly: clear condensation from the steam wand before steaming.
- Stretch phase: introduce air only at the start to build fine foam (avoid large bubbles).
- Texture phase: sink the tip slightly to form a rolling whirlpool that integrates foam.
- Stop at temperature: end steaming at your preferred heat level; immediately wipe and purge the wand again.
- Polish the milk: swirl and tap the pitcher to remove surface bubbles and create glossy microfoam.
Quick checklist for dialed-in milk texture
| Step | What to watch for | Adjustment if off |
|---|---|---|
| Start | Cold milk and clean pitcher | Use colder milk or chill the pitcher if steaming too fast |
| Stretch | Quiet paper-tearing sound; small bubbles only | If screeching: lower tip depth; if big bubbles: reduce air intake time |
| Roll | Strong whirlpool; foam integrates | If foam sits on top: deepen tip slightly and increase swirl |
| Finish | Glossy paint-like sheen; no visible bubbles | Tap + swirl longer; reduce initial air next time |
| Pour | Controlled stream from spout | If blobby: polish longer; if too thin: add slightly more air next time |
Using the scale markings to reduce waste and improve consistency
Markings or built-in scale lines make it easier to standardize “how much milk starts in the pitcher,” which is where waste often begins.
- Set simple targets by drink size: create one repeatable fill line/weight for cappuccinos and another for lattes, using your actual cups.
- Adjust based on leftovers: if milk is consistently left behind after pouring, reduce the target slightly until you finish the pour with minimal waste.
- Pre-dose when making multiple drinks: bringing each pitcher to matching targets keeps workflow smooth and reduces mid-rush guesswork.
- Pair milk consistency with espresso consistency: a steady espresso yield plus a steady milk dose makes flavor balance easier to repeat.
Over time, this becomes a simple “house recipe” at home: a known espresso yield, a known milk dose, and a familiar steaming routine that produces the same mouthfeel day after day.
Care, cleaning, and keeping markings readable
Good cleaning habits protect both the stainless steel and the clarity of the measurement lines.
Who this pitcher suits best
In-stock picks from our store
- Stainless Steel Milk Frothing Pitcher with Scale
- 66W 5A Fast Charging Spring Retractable USB Type C Cable – For Car & On-the-Go
- Men’s Genuine Leather Belt with Classic Metal Pin Buckle – Casual & Dress
FAQ
Is a stainless steel milk pitcher safe for steaming milk?
Yes, as long as it’s made from food-grade stainless steel and cleaned properly. Stainless steel is widely used for dairy handling and café steaming because it’s durable and resists corrosion with normal care.
Do the scale markings replace a digital scale?
Scale markings are great for quick, repeatable dosing during everyday drink making. A digital scale is still best for precise recipe work and detailed dialing-in, so many people use both depending on the goal.
Can it go in the dishwasher?
Handwashing is the easiest way to preserve the finish and keep markings readable over time. If you do use a dishwasher, place it securely and avoid harsh detergents or abrasive cycles that may dull the exterior.
Recommended for you

Genuine Leather Belts: Good, Bad, and What to Buy
Jul 21, 2026
Will a USB Rechargeable Fan Damage Your Power Bank?
Jul 21, 2026













Leave a comment